Master Crispy Baked Coconut Shrimp: Better Than Any Restaurant
Imagine sinking your teeth into a perfectly golden, impossibly crispy coconut shrimp, followed by a burst of sweet, tender, juicy shrimp. Now, imagine achieving that restaurant-quality experience in your own kitchen, without the greasy mess of deep frying. Forget everything you thought you knew about homemade appetizers because this recipe for **crispy baked coconut shrimp** is about to revolutionize your snacking game. It’s not just *good*; it's *better* than anything you’ll find dining out, offering a healthier, more flavorful, and incredibly satisfying culinary adventure right from your oven.
We're not just making coconut shrimp; we're crafting an experience. Each bite delivers a delightful symphony of textures and tastes – the sweet, crunchy exterior giving way to succulent shrimp, all without the guilt of excessive oil. Whether you're planning a cozy night in, an elegant dinner party appetizer, or simply craving a taste of the tropics, this recipe promises to deliver. Ready in under 30 minutes from start to finish, it's the perfect solution for a quick snack or a show-stopping starter.
Why Baking is the Secret Weapon for Health and Unbeatable Crispiness
When most people think of coconut shrimp, they often envision a deep fryer bubbling with oil, leading to a heavy, sometimes greasy, end product. But what if we told you that the secret to achieving truly superior **crispy baked coconut shrimp** lies not in a vat of hot oil, but in the controlled, even heat of your oven? Baking not only eliminates the need for excessive fats, making this a significantly healthier option, but it also allows for a more consistent crisp that truly shines.
The oven provides a dry heat environment that dehydrates the coating evenly, leading to an incredibly satisfying crunch without the soggy potential of frying. Plus, the cleanup is a breeze! No splattering oil, no disposing of used grease – just a simple baking sheet and a few bowls. This method is a game-changer for anyone looking to enjoy their favorite appetizer guilt-free and mess-free. If you're eager to discover more about achieving that perfect crunch without a fryer, dive into our guide on how to
Unlock Perfectly Crispy Baked Coconut Shrimp Without Frying. It truly is a revelation how easy it is to elevate this dish.
Mastering the Magic: Key Ingredients and the Art of the Crispy Coating
The foundation of any exceptional dish lies in its ingredients, and our **crispy baked coconut shrimp** are no exception. Each component plays a crucial role in building layers of flavor and, most importantly, achieving that coveted crunch.
*
The Star: Shrimp
For the best results, opt for
large, fresh shrimp, peeled and deveined, ideally with the tails left on for a more elegant presentation and easier handling. The tails act as a natural handle for dipping! If fresh isn't an option, high-quality frozen shrimp work wonderfully, but remember the golden rule:
thaw them completely and pat them bone-dry. Excess moisture is the enemy of crispiness, preventing the coating from adhering properly.
*
The Crunch Factor: Panko Breadcrumbs
This is where the magic truly happens for crispiness. Panko breadcrumbs, a Japanese-style breadcrumb, are coarser, lighter, and flakier than traditional breadcrumbs. Their unique texture allows them to absorb less oil and become incredibly airy and crisp when baked. While regular breadcrumbs can be substituted, they simply won't deliver the same unparalleled crunch. For those with dietary restrictions, gluten-free panko options are widely available and work just as well!
*
The Tropical Sweetness: Shredded Coconut
Sweetened shredded coconut is your ticket to that classic, delightful flavor profile. It caramelizes beautifully in the oven, adding another layer of texture and a hint of tropical sweetness. If you prefer a less sweet profile, unsweetened shredded coconut is a perfect alternative. Avoid using coconut flour as a direct substitute here; its purpose is different, and it won't contribute to the desired crispy texture.
*
The Adhesive Trio: Flour, Eggs, Seasoning
This classic breading station ensures every shrimp is perfectly coated.
*
All-purpose flour (seasoned with salt and black pepper) provides the first dry layer, creating a surface for the egg to cling to.
*
Whisked eggs act as the "glue," binding the dry flour to the panko and coconut.
*
Salt and pepper enhance the natural sweetness of the shrimp and the richness of the coating.
*
The Golden Touch: Cooking Spray
A light mist of cooking spray before baking is indispensable. It provides just enough fat to help the panko and coconut turn a beautiful golden-brown and achieve a truly irresistible crispy crust without the need for deep frying.
Your Step-by-Step Guide to Irresistible Crispy Baked Coconut Shrimp
Crafting these delectable shrimp is surprisingly simple, especially when you set up your workspace efficiently. This recipe is designed to be quick and easy, making it an ideal choice for an appetizer that tastes like it took hours, but only requires about 10 minutes of prep and 15 minutes of baking. For more insights on making delicious meals in a flash, check out our
Easy & Healthy Baked Coconut Shrimp Recipe: Ready in 30 Minutes.
Ingredients You’ll Need:
* 1 lb large shrimp, peeled and deveined, tails on (if desired)
* ½ cup all-purpose flour
* ½ tsp salt
* ¼ tsp black pepper
* 2 large eggs, whisked
* 1 cup panko breadcrumbs
* ¾ cup shredded sweetened coconut (or unsweetened for less sweetness)
* Cooking spray or a light brushing of oil
* Fresh parsley or cilantro, chopped (optional, for garnish)
* Sweet chili sauce or your preferred dipping sauce
Equipment:
* Baking sheet
* Parchment paper
* 3 shallow bowls
Step-by-Step Instructions:
1.
Preheat and Prepare Your Baking Canvas:
Begin by preheating your oven to a robust
400°F (200°C). This high temperature is key for achieving that immediate crisp. Line a large baking sheet with parchment paper for easy cleanup and to prevent sticking. If you don't have parchment, a light spray of cooking spray or a thin coat of oil on the baking sheet will work.
2.
Construct Your Breading Assembly Line:
Set up three shallow bowls in a row, mirroring an efficient assembly line.
*
Bowl 1 (Dry Base): Combine the all-purpose flour, salt, and black pepper. Whisk them together until well blended.
*
Bowl 2 (The Binder): Pour in your well-beaten eggs. Make sure they are thoroughly whisked for even coverage.
*
Bowl 3 (The Crunch & Flavor): In this bowl, mix the panko breadcrumbs and the shredded sweetened coconut until evenly combined. This creates your signature crispy coating.
3.
The Art of Breading Each Shrimp:
This step requires a light touch and attention to detail for maximum crispiness.
* Take one shrimp at a time (remember, they should be patted *very dry*).
* First, dredge the shrimp in the flour mixture (Bowl 1), ensuring it’s lightly and evenly coated. Shake off any excess flour.
* Next, dip the floured shrimp into the whisked egg (Bowl 2), allowing any excess egg to drip off. The egg acts as your glue.
* Finally, press the shrimp gently into the panko and coconut mixture (Bowl 3), turning it to ensure it’s thoroughly coated on all sides. Don't be shy about pressing lightly to help the coating adhere.
* Place the breaded shrimp in a single layer on your prepared baking sheet, leaving a little space between each one to ensure even cooking. Repeat with all remaining shrimp.
4.
The Golden Finish: Spray and Bake:
Once all the shrimp are breaded and arranged on the baking sheet, lightly mist them with cooking spray. This is crucial for developing that beautiful golden-brown color and extra crispiness.
Transfer the baking sheet to your preheated oven and bake for approximately
12-15 minutes. Halfway through, around the 6-7 minute mark, gently flip each shrimp to ensure both sides brown and crisp up perfectly. The shrimp are done when the coating is golden brown and the shrimp itself is pink and opaque throughout.
5.
Serve Immediately and Garnish:
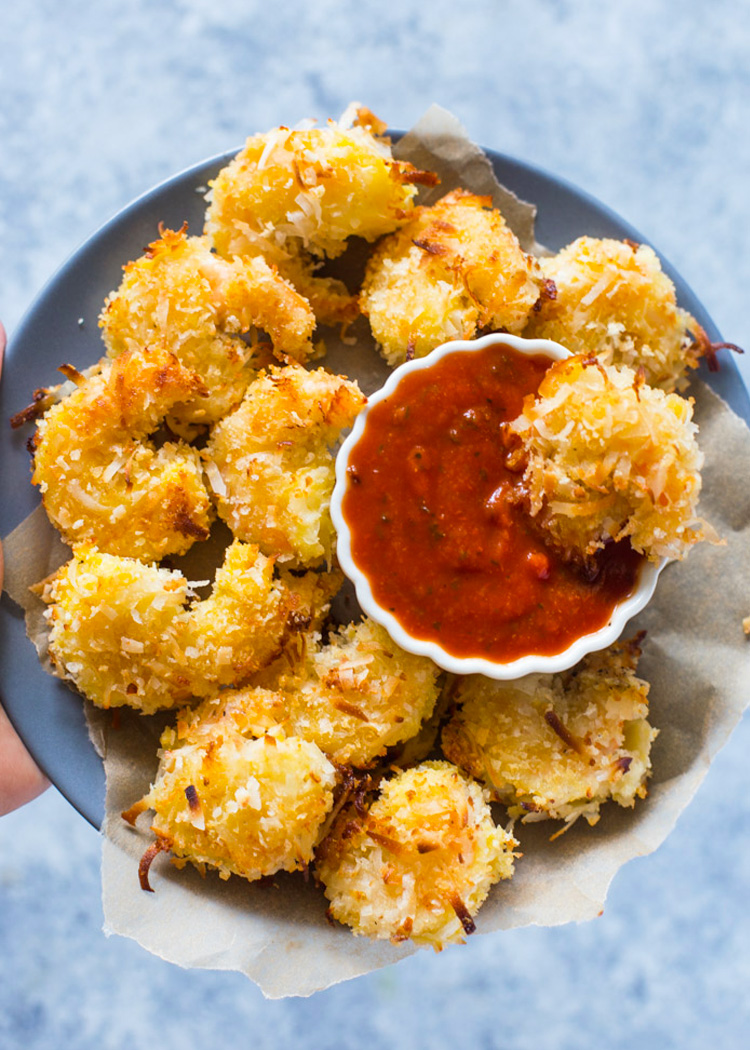
Remove the **crispy baked coconut shrimp** from the oven. For an extra touch of freshness and color, sprinkle with freshly chopped parsley or cilantro. Serve them piping hot with your favorite dipping sauce.
Beyond the Shrimp: Dipping Sauces and Serving Suggestions
While the **crispy baked coconut shrimp** are undoubtedly the star, the right dipping sauce elevates the experience to truly restaurant-level status. Our go-to is classic sweet chili sauce, with its perfect balance of sweet, spicy, and tangy notes that beautifully complement the rich coconut and savory shrimp.
For a homemade sweet chili sauce that truly shines, simply combine equal parts of your favorite chili garlic sauce with sugar, and add a splash of fresh lime juice. Whisk until the sugar dissolves, and you'll have a vibrant dip ready in seconds.
Feeling adventurous? Consider these delightful alternatives:
*
Spicy Mayo: Mix mayonnaise with sriracha to taste, perhaps a squeeze of lime. It’s creamy, tangy, and has a pleasant kick.
*
Mango Salsa: A fresh, fruity salsa with diced mango, red onion, cilantro, and lime juice offers a bright, tropical contrast.
*
Pineapple Chutney: The sweet and savory notes of a pineapple chutney would perfectly echo the flavors of the shrimp.
*
Zesty Lime Aioli: Garlic, mayonnaise, and plenty of fresh lime juice create a rich, citrusy dip.
For serving, arrange your glorious **crispy baked coconut shrimp** on a platter with small bowls of your chosen dipping sauces. Garnish with lime wedges and fresh herbs. These shrimp make a fantastic appetizer, but they can also be transformed into a light, satisfying meal when served alongside a fresh green salad or some fluffy jasmine rice.
Conclusion: Your Home, Your Culinary Masterpiece
You now possess the knowledge and the recipe to create **crispy baked coconut shrimp** that will impress even the most discerning palates. This isn't just a recipe; it's a testament to how simple techniques and quality ingredients can transform a humble dish into something extraordinary – something truly better than any restaurant offering. The health benefits, the ease of preparation, and the undeniable explosion of flavor make this a staple for any home cook. So, preheat your oven, gather your ingredients, and prepare to embark on a delicious journey. Enjoy the crisp, the sweetness, the tender shrimp, and the compliments that are sure to follow!