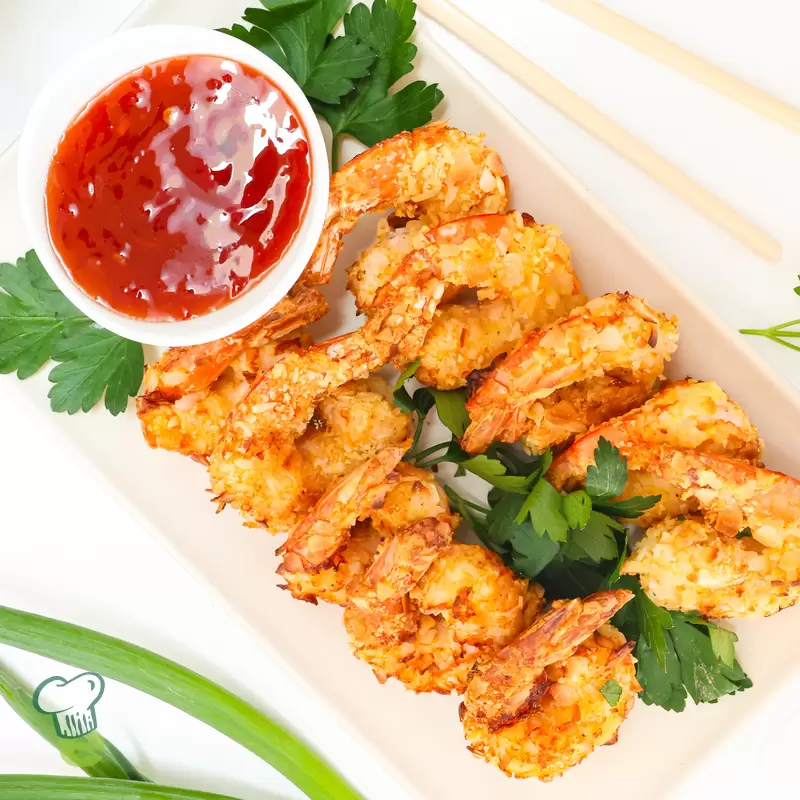
Imagine biting into a perfectly golden, intensely flavorful shrimp, encased in a delicate yet satisfyingly crunchy coating. Now, picture achieving this culinary delight in your own kitchen, without the mess and added fat of deep-frying, and in less than 30 minutes! Our recipe for crispy baked coconut shrimp delivers on all fronts: it's incredibly easy, surprisingly healthy, and bursts with tropical flavor. Forget takeout; these homemade beauties will transport your tastebuds straight to a beachside paradise, whether you're serving them as a fun appetizer, a light lunch, or a special treat on a cozy night in.
Why This Crispy Baked Coconut Shrimp Recipe is Your New Go-To
There’s a reason why coconut shrimp remains a perennial favorite on restaurant menus. The irresistible combination of sweet, succulent shrimp with a crunchy, subtly sweet coconut crust is simply divine. But what if you could replicate that restaurant-quality experience at home, with a healthier twist and incredible speed? This recipe does exactly that, making it an instant classic for busy weeknights and spontaneous gatherings alike.
The Magic of Baking: Healthier & Easier
Traditionally, coconut shrimp is deep-fried, resulting in extra calories and a fair amount of kitchen cleanup. Our baked version bypasses these downsides entirely. By harnessing the power of a hot oven and clever coating techniques, we achieve an unparalleled crispiness that rivals any fried counterpart, but with significantly less oil. This means you can indulge without the guilt, and spend less time scrubbing pans and more time enjoying your delicious creation. The baking method also allows for more consistent results and is much safer than handling hot oil.
Flavor Profile: Sweet, Savory, and Seriously Addictive
The beauty of this dish lies in its exquisite balance. The natural sweetness of the shrimp perfectly complements the rich, tropical notes of the coconut. A hint of savory seasoning in the breading elevates the overall taste, creating a symphony of flavors that is both comforting and exciting. Paired with a vibrant dipping sauce, each bite of these crispy baked coconut shrimp is an explosion of texture and taste that will leave you craving more. They truly are a party on a plate!
Unlocking Unrivaled Crispy Baked Coconut Shrimp: The Secrets Revealed
Achieving that coveted, shatteringly crisp exterior without deep-frying might seem like a culinary enigma, but it's surprisingly simple when you know the tricks. The secret lies in a combination of carefully selected ingredients and precise technique. These are the foundational principles that will elevate your baked coconut shrimp from good to absolutely glorious.
Ingredient Spotlight: The Crispy Foundation
- Shrimp Selection is Key: Opt for large shrimp (around 16-20 count per pound), preferably with the tails on for easy handling and a professional presentation. Whether fresh or frozen, the most critical step is to ensure your shrimp are completely thawed and bone-dry before you begin. Moisture is the enemy of crispiness; any residual water will steam the coating instead of allowing it to crisp up. Pat them thoroughly with paper towels until no moisture remains.
- Panko Breadcrumbs: The Unsung Hero: While regular breadcrumbs will work in a pinch, panko breadcrumbs are non-negotiable for superior crispiness. Panko flakes are larger, airier, and have a unique jagged texture, which creates more surface area for a crispy crunch. They absorb less oil during baking, resulting in a lighter, more delicate crisp. For those with dietary restrictions, gluten-free panko is an excellent substitute that still delivers on texture.
- Shredded Coconut: Sweet or Unsweetened: Sweetened shredded coconut provides that classic, dessert-like tropical flavor profile. However, if you prefer less sweetness or want the natural shrimp flavor to shine through more, unsweetened shredded coconut is a fantastic alternative. You can also experiment with toasting the coconut lightly before mixing it with the panko for an even deeper, nuttier flavor.
Mastering the Breading Station: Layer by Layer Perfection
The breading process is where the magic truly happens. Think of it as an assembly line, ensuring each shrimp receives an even, thin, and secure coating.
- The Flour Dredge: A light dusting of seasoned flour (with salt and pepper) provides the initial dry surface for the egg wash to adhere to. This first layer is crucial for moisture absorption and ensuring the subsequent layers stick effectively.
- The Egg Bath: Whisked eggs act as the binder, creating a sticky surface that allows the panko and coconut to cling on. Ensure the shrimp are fully coated, but let any excess egg drip off before moving to the final layer.
- The Panko-Coconut Blend: This is where the crispy texture and flavor develop. Press each shrimp firmly into the panko and coconut mixture, ensuring it's completely coated on all sides. Don't be shy – a good press helps the coating adhere and prevents it from falling off during baking. Maintain thin, even layers; too thick, and the coating can become claggy or fall off.
Baking to Golden Perfection: Tips for Maximum Crunch
The oven is your ally in achieving that irresistible crunch without a deep fryer. Here are the keys to success:
- High Heat is Your Friend: A preheated oven to 400°F (200°C) is essential. High heat quickly crisps the coating before the shrimp overcooks, ensuring juicy interiors and golden exteriors.
- Parchment Paper & Spacing: Always line your baking sheet with parchment paper for easy cleanup and to prevent sticking. Arrange the breaded shrimp in a single layer, ensuring they don't touch each other. Overcrowding the pan will create steam, which, as we know, is the enemy of crispiness. Adequate spacing allows hot air to circulate freely around each shrimp.
- A Touch of Oil: A quick spray of cooking spray or a light drizzle and brush of a neutral oil (like avocado or grapeseed oil) over the breaded shrimp before baking is crucial. This provides the necessary fat for browning and helps achieve that beautiful golden crust, mimicking the effect of frying without submerging the shrimp in oil.
- The Flip Factor: Midway through baking, gently flip each shrimp. This ensures even crispiness on both sides, guaranteeing a perfectly golden and crunchy result all around. For even more in-depth techniques to master this, check out our guide on Unlock Perfectly Crispy Baked Coconut Shrimp Without Frying.
Ingredients You'll Need for Your 30-Minute Culinary Escape
Gathering your ingredients is the first step towards a fantastic meal. Here’s what you’ll need for these amazing crispy baked coconut shrimp:
- 1 lb large shrimp (16-20 count): Peeled and deveined, tails on for a classic look and easy dipping. Remember to pat them absolutely dry!
- 1/2 cup all-purpose flour: The first layer for adherence. You can use a gluten-free flour blend for a gluten-friendly option.
- 1/2 tsp salt: Essential seasoning for the breading.
- 1/4 tsp black pepper: Adds a hint of spice. Consider adding 1/4 tsp garlic powder or smoked paprika for extra depth.
- 2 large eggs: Lightly beaten in a shallow bowl to create the perfect sticky binder.
- 1 cup panko breadcrumbs: Your secret weapon for superior crispiness.
- 3/4 cup shredded sweetened coconut: For that classic tropical flavor. Use unsweetened for a less sweet profile, or a 50/50 mix.
- Cooking spray or 1-2 tbsp neutral oil: For greasing the baking sheet and spraying the shrimp for golden browning.
- Fresh parsley or cilantro (optional): Finely chopped, for garnish and a fresh finish.
- Sweet chili sauce: The quintessential dipping sauce! Alternatively, try homemade spicy mayo (sriracha + mayo + lime juice) or a fresh mango salsa.
Step-by-Step Guide to Your Easy & Healthy Baked Coconut Shrimp
Get ready to whip up these delectable shrimp in mere minutes!
- Preheat & Prepare: Begin by preheating your oven to 400°F (200°C). Line a large baking sheet with parchment paper or lightly grease it with cooking spray/oil to prevent sticking.
- Set Up Breading Stations: Grab three shallow bowls.
- Bowl 1 (Flour Mix): Combine the all-purpose flour, salt, and black pepper. Stir well.
- Bowl 2 (Egg Wash): Whisk the two large eggs until well beaten.
- Bowl 3 (Panko-Coconut): In the third bowl, combine the panko breadcrumbs and shredded coconut. Mix thoroughly.
- BREAD, BABY, BREAD! (The Coating Process): Working with one shrimp at a time, follow this sequence:
- Flour: Dredge the shrimp in the flour mixture, shaking off any excess.
- Egg: Dip the floured shrimp into the egg wash, allowing any extra to drip off.
- Panko-Coconut: Transfer the shrimp to the panko-coconut mixture. Press firmly to ensure the coating adheres well to all sides.
- Arrange on Baking Sheet: Place the breaded shrimp in a single layer on your prepared baking sheet, ensuring there’s ample space between each one to allow for even crisping. Don't overcrowd the pan.
- Spray & Bake: Lightly spray the tops of the shrimp with cooking spray or brush with a small amount of neutral oil. This helps them achieve that beautiful golden-brown color and irresistible crispiness. Bake for 7-8 minutes.
- Flip & Finish: Carefully flip each shrimp over and continue baking for another 6-7 minutes, or until the shrimp are opaque, cooked through, and the coating is golden brown and deliciously crispy. For even more insights into achieving perfection, check out: Master Crispy Baked Coconut Shrimp: Better Than Any Restaurant.
- Garnish & Serve: Once baked, transfer the crispy baked coconut shrimp to a serving platter. Garnish with fresh parsley or cilantro if desired, and serve immediately with your favorite sweet chili dipping sauce or other preferred sauces.
Serving Suggestions & Creative Twists
While these crispy baked coconut shrimp are fantastic on their own, they truly shine when paired with the right accompaniments.
- Dipping Sauce Galore:
- Classic Sweet Chili: Always a winner!
- Zesty Lime-Cilantro Dip: Mix Greek yogurt or sour cream with fresh lime juice, chopped cilantro, a pinch of garlic powder, and a dash of salt.
- Spicy Mango Salsa: A refreshing blend of diced mango, red onion, jalapeño, cilantro, and lime juice.
- Homemade Spicy Mayo: Simply combine mayonnaise, sriracha, and a squeeze of lime juice to taste.
- Make it a Meal:
- Serve alongside a vibrant tropical coleslaw or a simple green salad with a citrus vinaigrette.
- Pair with jasmine rice or cauliflower rice for a more substantial plate.
- Add a side of stir-fried vegetables for a balanced and flavorful dinner.
- Party Perfect: Arrange them on a platter with lime wedges and various dipping sauces for an impressive and easy appetizer that will disappear fast!
- Make-Ahead Tips: You can bread the shrimp up to an hour in advance and keep them refrigerated on the baking sheet until ready to bake. For longer storage, freeze the breaded shrimp on a baking sheet, then transfer to an airtight bag once frozen. Bake from frozen, adding a few extra minutes to the cooking time.
This easy, healthy, and incredibly flavorful recipe for crispy baked coconut shrimp is a game-changer for anyone craving that restaurant experience without the fuss or the guilt. With just a few simple ingredients and clever techniques, you can achieve perfectly golden, crunchy, and juicy shrimp every single time, ready to enjoy in under 30 minutes. So go ahead, whip up a batch, dip into your favorite sauce, and savor the taste of a tropical escape right from your own kitchen!
